因為之前參考的網頁失蹤了 所以這幾天又重新搞了一次編譯 把過程記錄下來以免我的參考網頁又被駭掉 囧
我輸入的指令是用紅色標起來的部分
首先要安裝ubuntu 這面的參考網頁很多 可以自己找
以下是我的參考網頁
http://www.howtoforge.com/kernel_compilation_ubuntu
一.ubuntu一開始的設定root是鎖的要先解開 解開方法如下(解開可以省掉每次都要打sudo的麻煩)
參考網頁
http://sophialiu.pixnet.net/blog/post/9304697
1.在[系統]->[管理]->[使用者及群組] 按下root->解除鎖定
給 root 設密碼
2.在[系統]->[管理]->[登入畫面]->[安全性]
勾選 [允許本地端系統管理員登入]
I prefer to do all the steps here as the root user. So if you haven't already created a root login, you should do so now:
指令: sudo passwd root
然後輸入新密碼
指令: su
然後輸入上一步設的密碼
如此一來就可以用root的身分登入
如果你是用一般使用者的身分登入 則每個指令前都要加sudo
例如:apt-get update
你要輸入:sudo apt-get update
二. Install Required Packages For Kernel Compilation
First we update our package database:
apt-get update
Then we install all needed packages like this:
apt-get install kernel-package libncurses5-dev fakeroot wget bzip2
因為我目前還不知道需要哪些 所以看到的都用了 我輸入的是下面這行指令
指令:apt-get install build-essential bin86 kernel-package libqt3-headers libqt3-mt-dev
3 Download The Kernel Sources
Next we download our desired kernel to /usr/src. Go to www.kernel.org and select the kernel you want to install, e.g. linux-2.6.18.1.tar.bz2 (you can find all 2.6 kernels here: http://www.kernel.org/pub/linux/kernel/v2.6/). Then you can download it to /usr/src like this:
cd /usr/src
wget http://www.kernel.org/pub/linux/kernel/v2.6/linux-2.6.18.1.tar.bz2
Then we unpack the kernel sources and create a symlink linux to the kernel sources directory:
tar xjf linux-2.6.18.1.tar.bz2
ln -s linux-2.6.18.1 linux
cd /usr/src/linux
我安裝的是 2.6.35.2版 所以指令是
cd /usr/src
wget http://www.kernel.org/pub/linux/kernel/v2.6/linux-2.6.35.2.tar.bz2
tar xjf linux-2.6.35.2.tar.bz2
ln -s linux-2.6.35.2 linux
cd /usr/src/linux
(我之前不成功的原因也紀錄一下 因為我跑去用了2.6.11.1的版本 可能太久了 所以就一直的出錯 後來用了較新版本才work)
5 Configure The Kernel
It's a good idea to use the configuration of your current working kernel as a basis for your new kernel. Therefore we copy the existing configuration to /usr/src/linux:
cp /boot/config-`uname -r` ./.config
Then we run
make menuconfig
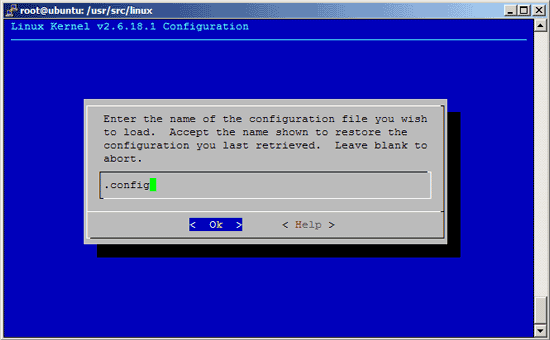
which brings up the kernel configuration menu. Go to Load an Alternate Configuration File and choose.config (which contains the configuration of your current working kernel) as the configuration file:
圖片在此


藍色的部分是所選的選項
6 Build The Kernel
To build the kernel, execute these two commands:
make-kpkg clean
fakeroot make-kpkg --initrd --append-to-version=-custom kernel_image kernel_headers
custum是可以更改的 可以自己為kernel取名子 接下來會經過漫長的等待
接下來就是我遇到問題的解決參考網址
http://www.linuxconfig.org/building-kernels-the-debian-way
我遇到的問題是 編譯出現error 以下是error訊息
echo "The UTS Release version in include/linux/version.h"; echo "
\"\" "; echo "does not match current version:"; echo "
\"2.6.34\" "; echo "Please correct this."; exit 2
The UTS Release version in include/linux/version.h
           ""
does not match current version:
           "2.6.34"
Please correct this.
make[1]: *** [debian/stamp/install/linux-image-2.6.34] Error 2
make[1]: Leaving directory `/home/lilo/temp/linux-2.6.34'
make: *** [kernel_image] Error 2
輸入以下指令:
cp include/generated/utsrelease.h include/linux/
再輸入:fakeroot make-kpkg --initrd --append-to-version=-custom kernel_image kernel_headers
就可重新編譯成功
7 Install The New Kernel
After the successful kernel build, you can find two .deb packages in the /usr/src directory.
cd /usr/src
ls -l
On my test system they were called linux-image-2.6.18.1-custom_2.6.18.1-custom-10.00.Custom_i386.deb (which contains the actual kernel) and linux-headers-2.6.18.1-custom_2.6.18.1-custom-10.00.Custom_i386.deb (which contains files needed if you want to compile additional kernel modules later on). I install them like this:
dpkg -i linux-image-2.6.18.1-custom_2.6.18.1-custom-10.00.Custom_i386.deb
dpkg -i linux-headers-2.6.18.1-custom_2.6.18.1-custom-10.00.Custom_i386.deb
(You can now even transfer the two .deb files to other Ubuntu systems and install them there exactly the same way, which means you don't have to compile the kernel there again.)
That's it. You can check /boot/grub/menu.lst now, you should find two stanzas for your new kernel there:
vi /boot/grub/menu.lst
The stanzas that were added on my test system look like these:
title Ubuntu, kernel 2.6.18.1-custom |
Now reboot the system:
shutdown -r now
If everything goes well, it should come up with the new kernel. You can check if it's really using your new kernel by running
uname -r
This should display something like
2.6.18.1-custom
以上請記得把版本改成自己下載的版本


 留言列表
留言列表
